Painting can be a fun activity, but one needs to know the exact preparation process before beginning. And that is why I am here today.
I know that oil-based paint thinning is a professional task, and amateurs cannot do it without proper knowledge. Now I had been thinking of attempting it, but I needed to get some good pointers before beginning.
So, I approached the local hardware store owner, and he told me all about how to thin oil based paint before spraying it with a gun. Hi! I am Stacy Smith, and today I will explain the step-by-step process in this detailed guide.
Without further ado, dive in!
How To Thin Oil-Based Paint?

I will first discuss the items that are needed for this process, and then I will move on to the steps involved in thinning oil-based paint. Read on to know all about it.
What Are The Materials Needed?
You will need a few pieces of equipment other than the thinner to get the job done. This includes a bucket to pour the paint in and some sticks or ladles to stir. The stirrer could be made of wood or plastic. You will also need gloves as you’ll be working with paint which can be difficult to remove from the skin.
Furthermore, remember that some of the paints do not need to be thinned, and the label will tell you which ones. So, read the label carefully before purchasing. If you ask me, I will suggest getting paint which is not thinned as it is more cost-effective. One paint bottle can cover a large area as the volume will primarily be increased by the thinner.
Steps To Thinning Oil Based Paint
Once all your supplies are in place, you can get to work. I would suggest that you follow the steps I have noted down below. These pointers will help in thinning the paint, and you can then use them with a spray gun.
1. Straining
First of all, the paint needs to be taken out of the bottle and strained. Professionals would use a bucket for this purpose. Place a strainer on top of the bucket and let the paint flow through it. Any large or hard lumps will be caught in the strainer, and you can later throw them away.
Use a ladle or a stick to move your paint around in the strainer so that all the liquid is well-drained.
2. Adding The Thinner
Once all the paint has been poured through the strainer, you can move on to adding the thinner. Now maintaining the paint and thinner ratio is extremely important, and that will help you get a perfect consistency. Read the back of the paint bottle to understand how much substance needs to be mixed.
In case nothing is mentioned, I would suggest that you mix 3 parts of paint along with a single part of thinner. This should let you achieve the right consistency and texture. Remember that the quantity of paint should always be more than the thinner.
If you add too much of the thinner, then the finished surface will have a very thin layer of color, and you will have to add around 3-4 layers.

- Not for sale in California and other VOC restricted areas
- Completely odorless solvent for thinning oil-based paints, primers, varnishes and stains
- May also be used to remove and dissolve grease, grime and oil
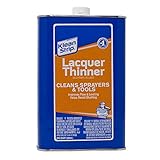
- Cleans sprayers
- Cleans tools
- Improves flow
3. Stirring
Next, you will have to stir this mixture well and ensure that all the paint mixes with the thinner. The stirrer can be made of plastic or wood, and it has to be clean. If you are unsure, wash it well and only then use it. Any dirt particles on the body will lead to lumps in the solution, which you do not want.
The store owner suggested a kind of stirrer that could be attached to the drill. This is for those who want to get done with the work faster. It also prevents any hand fatigue caused due to the mixing of a large amount of paint.
But this is of a higher price, and I would suggest getting it only if you are working with large volumes of oil-based paints and thinners.
4. Testing
After you have mixed them entirely, move on to the next step, and that involves experimenting. The store owner was kind enough to share this trick with me, and it helped in making sure that the paint was thin enough to be used.
Use a funnel to pour the paint into another bucket. If it flows freely, then you will know that you can use it with a spray gun.
Tips To Remember
After the paint is thin enough, you can begin working immediately. Just remember that the thinner will lighten the paint to some extent. Also, it will take more time to dry, but that should not be a problem.
However, as the paint will not be very thick anymore, you will have to add more than one coat to achieve the desired shade. You can also top it up with a protective coating. Always wait in between the application of layers so that the previous one dries up altogether. You would not want to be applying a layer over a wet surface.
Summing It Up
Before you begin painting the surface, remember to clean it well. It is best if you could add a primer on the old painted surface and then begin with the work. There are separate primers for oil-based paints. Please buy one which is suitable to be used and is not water-based.
Also, read the label carefully before proceeding. I was told specifically by the shop owner to do this as some paints require different amounts of thinner. Once you purchase the right products, the job should become pretty easy.
One last fact that you should remember is that the temperature will determine how the thinner works with the paint. So, keep that in mind while working. I will now take your leave, and I hope you have a trouble-free experience with this.
Take care. Happy painting!