Any homeowner with a garden can agree that a cozy outdoor space is a must-have.
Now, I’ve got a few chairs and a table, but I needed something more snug and comfy for just laying down and daydreaming! All of us have days when we want to escape from reality, don’t we?
So, I purchased a hammock glider a few months ago. It’s served me well, but the plain grey covers soon became an eyesore. Even my neighbor, Angie, suggested that I change the covers to match the rest of my outdoor furniture.
What next? I decided to upcycle some old bedsheets, and with a little bit of sewing and stitching, my cushion was ready. I can’t wait for you to try out this fun DIY project, so I curated this guide on how to make an outdoor glider cushion.
Let’s get started!
A Brief Guide On Glider Cushions

What Is A Glider Cushion?
Glider cushions are simply cushions meant for a glider chair. Such chairs have a slightly reclined backrest with proper armrests, making them more comfortable than regular chairs.
Glider chairs are a common pick for living rooms and outdoor purposes. But like most outdoor furniture, these chairs suffer from regular wear and tear. Usually, the cushions bear most of the damage, like tearing and fading.
How To Make An Outdoor Glider Cushion?
Making an outdoor glider cushion is an easy, cost-efficient way to give a quick makeover to your outdoor space. You don’t need to be an expert sewist or buy brand new cloth. However, we recommend using an all-weather fabric.
Step 1- Measurements And Calculations
Start by measuring the breadth of the glider seat. Double the measurement and keep 12 inches extra as a margin of error. This will ensure you have enough fabric left for seam allowances between the cover and the sides of the cushion.
Now, measure the length of the glider seat and add 6 inches to the front and 12 inches to the back. So, you will have 18 inches in total for seam allowances.
Finally, multiply the width and depth of the seat base to determine the amount of upholstery foam required for the project. For piping, you will need to double the previous measurement and round it up into yards.
Step 2- Cutting The Fabric
In this step, you need to fold the fabric right side down and place it on the work surface. Ensure that the surface is flat to avoid any cutting and sewing mistakes. According to the measurements in the previous step, cut seven pieces of cloth. These pieces include the top, bottom, both sides of the cushion, two for the back and one for the front gusset.
Step 3- Sewing The Back Gusset
Take the piece for covering the back gusset and make a ¼-inch fold on its edge. Press it flat to form a crease. Now, make a ¾-inch fold on the same side and pin the edge. Sew along the crease. Do the same with the second cut piece.
Step 4- Pinning The Gussets
First, pin the side gussets to either side of the front gusset. Ensure that the printed sides (right sides) are joined together. Place the two back gussets on top of each other with the finished edges together. Further, pin them to the free edges of the side gussets.
Step 5- Sewing The Gussets Together
Now, it is time to build the blocks! Leaving seam allowances of ½ inch, sew all the corners of the gussets. Ensure that the size of the needles suits the thickness of the upholstery.
For instance, if you’re using thinner fabrics, you can opt for a 14/90 needle. I wanted a canvas glider cushion for my second project, so I went with a 16/100 needle. You can even ask the retailer in case of any doubts.
For thread tension, you can test it on a rough patch beforehand. I recommend checking the user manual of the sewing machine to avoid redoing any steps. Note that the thread tension can vary during the process as some areas may have thicker layers of gussets.
Step 6- Arranging The Piping
Lay the fabric for the top piece right side up on your work area and line the piping so that the raw sides of both are aligned. Keep the piping facing the middle of the fabric piece. Now, arrange the side gussets on the piping such that the printed side is underneath and pin them to the top piece. Ensure that the piping remains in between.
Step 7- Inserting The Piping
Switch to a zipper foot and modify the thread tension if needed. Start sewing the cloth pieces with the piping in between. Once you reach a corner, cut the extra piping and not the cord.
Now, repeat the previous arrangement and sewing steps for the bottom piece of the fabric. Remember to snip the extra piping while sewing it to the gussets, along with the bottom fabric.
Step 8- Finishing Touches
Remove the pins once you’ve completed the sewing process. Turn the covers so that the printed sides are outwards.
Step 9- Fill The Glider Cushion
Cut the required amount of upholstery foam to fill in the cushion cover. You can use shears, a pocket knife, or even a large pair of scissors- no rules here! Fill the cushion cover with foam and adjust it so it lays flat on the glider seat.
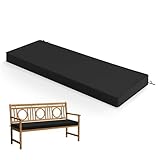
- Perfect Size for Most Benchs: Package contains 1 piece patio cushion for outdoor furniture measures 48 x 18 inches with a 3-inch thickness, providing a comfortable fit for a variety of seating options such as garden benches, front porch swings,outdoor picnic bench and patio furniture. Make sure to measure your furniture beforehand to ensure the perfect fit.
- Waterproof & Colorfast: Crafted from high-quality 250gsm polyester fabric, this premium outdoor bench cushion are designed to withstand the elements. The weatherproof fabric keeps your cushion dry and protected from rain, while the anti-fading technology ensures vibrant colors even after extended exposure to sunlight.
- High-Density Foam for Ultimate Comfort: Filled with 28D high-density sponge, Summsun outdoor cushions for patio furniture offers excellent support, reducing pressure on your hips, lower back, and sciatic nerve. The foam's high rebound properties ensure long-lasting comfort, making it perfect for long periods of sitting without discomfort.

- High-density Foam: the thickness of outdoor bench cushion is 3 in. The foam of porch swing cushions not only gives you enough support, but its recovery feature allows the patio bench cushions to retain its original shape after sitting for a long time
- Waterproof Cover, the bench cushions for outdoor furniture are made of 300GSM polyester with waterproof PU coating, which is light and thick, effectively preventing water from splashing. Nice replacement cushions for outdoor furniture for daily using
- Excellent Details: The bench seat cushion attached ties, ensure that the cushions are securely attached to your furniture. The bench pad feature a hidden zip for easy care
Conclusion
And there you have it- a brand new cushion for your outdoor glider!
You can take the makeover up a notch by painting the glider frame, especially if rusted. Usually, you will not need any primer before painting, but there’s no denying that priming provides better adhesion.
With that said, I hope this guide will encourage you to get crafty and make your own glider cushion. I highly recommend this method for those who own customized gliders that may not be of a standard size.
Stay tuned for more such informative reads, and I’ll be back soon. Until then, stay safe!