For a long time, there was no designated viewing space in my garden.
I had this fear that whatever structure I put up would come crashing down, destroying my plants. So, all I did was squat next to my favorite flowers or sit in the dirt.
Seeing my plight, my son decided to build a gazebo. This seemed like a reasonable idea since there was a concrete space that no one ever used. It was perfect for viewing my garden, and I could also arrange chairs to entertain guests; however, my fear still persisted.
My son assured me that everything would be fine, and over the weekend, he built a fine gazebo. But I had barely begun to enjoy my new space when a sudden torrential downpour, accompanied by strong winds, tilted the structure to one side.
Despite having my worst fears realized, I took it upon myself to resurrect the unit. After a quick internet search, I learned how to anchor a gazebo to concrete, and since then, the structure has held firm through many seasons.
Hi! I'm Stacy Smith, and today I'll tell you how to do the same.
How To Anchor A Gazebo To Concrete?

There are two primary ways you can anchor a gazebo to concrete. In this section, I'll highlight the process of drilling it into concrete, followed by another method where there's no need for drilling.
Both these techniques require certain tools for the construction, which I'll discuss in due course. Without further ado, let's begin.
1. Drilling
Drilling your gazebo into the concrete lends more stability to the structure but leaves permanent holes on the ground. So, if you're sure, purchase a hammer drill, a hammer, concrete wedge anchors, an open-end wrench, masking tape, and a vacuum cleaner for the purpose.
Then proceed to follow the steps mentioned below.
A) Drilling The Holes
Use tape to measure the length of the drill anchor on the drill bit. This will help you drill the holes to the correct depth, ensuring the gazebo doesn't tilt.
Next, locate the screw holes at the base of each post. You'll need to drill holes through these holes into the concrete for a secure fit. But don't rush lest you’ll damage the post or the concrete foundation.
B) Clean The Holes
After drilling, it's essential to clean the holes, removing the debris using the vacuum cleaner. Slowly, keep the posts aside and vacuum the hole, clearing the dust and dirt. Doing so allows you to smoothly slide the wedge anchors in place for a snug fit.
Now, you can lift the gazebo to its original position, ensuring that the holes and the posts are perfectly aligned. Once the structure is upright, move on to the next step.
C) Hammering
The final step is hammering the wedge anchors, but you must slide the washer onto each anchor before that and then screw the nut on the top. As a result, when you slam down on the anchors, the hammer won't miss, leaving the threads unharmed.
You should hammer each anchor into the respective hole, but make sure to leave ⅓-inch of the posts exposed. Lastly, tighten the nuts with an open-end wrench, locking the structure in the desired position.
2. Without Drilling
To anchor a gazebo without drilling, you need to follow these simple steps.
A) Using Planting Pots
This is an innovative and aesthetic way of ensuring that your gazebo stays in place. All you need is five-gallon planting pots for each of the four posts if it’s a traditional square gazebo. Users with an octagonal structure will need more pots, equivalent to the number of posts.
Then, simply lift the gazebo and place the posts into each pot.
B) Mixing The Concrete
Once the posts are in place, you need to fill the buckets with concrete so that the structure doesn't move. You can use a wheelbarrow or a bucket to form the mixture.
Although a little intricate, this step is easy and involves adding water to the powdered concrete. It's essential to keep stirring while adding the water until you reach the desired consistency.
To be sure, you can squeeze the mixture using your hand, ensuring that it isn't runny or gluey. However, unlike me, if you don't enjoy getting your hands dirty, feel free to purchase a ready-made concrete mix from the market.
C) Filling The Pots
Finally, dump the concrete mix into each bucket and wait for the mixture to dry. Depending upon what mixture you're using, the duration may vary for the posts to set. Quick-setting concrete usually dries with 20-40 minutes, so you need to be fast, while standard concrete mixtures take 48 hours to set.
So, keep an eye on the weather and choose a bright sunny day to set up the structure.
D) Painting The Pots
There's one thing you can do while the concrete dries. If you're creative like me, you can paint the plant pots, decorating them with various shapes and colors.
I also suggest using plant succulents and adding soil for growing durable plants. This will make the gazebo part of the garden, ensuring that it doesn't look out of place. You can also add string lights and turn them on after dark, creating the perfect setting.
The lights shouldn't be too bright as you wouldn't want to disrupt the daylight cycle of the plants. Nothing fancy, just something classy for a cup of evening tea under the stars, surrounded by your favorite flowers.
- Easy Gazebo Setup - Assemble this pop up gazebo in seconds with a one-push central locking system—no tools needed! Pinch-free buttons adjust to 3 height levels, and the compact carry bag fits in cars, RVs, or trucks. Say goodbye to setup stress and enjoy instant shade anywhere.
- Sturdy Patio Gazebo Frame - Our gazebo features a heavy-duty corrosion-resistant steel frame with reinforced legs and stable foot pads. It comes with 4 guy ropes, 8 ground stakes, and 4 sandbags to keep it steady in light wind or rain. Built to withstand seasons of use, this frame is your reliable outdoor partner.
- Pop up Gazebo with Mosquito Netting - Crafted with durable waterproof fabric, silver-coated interior blocks 99% UV rays. Double-vented roof boosts airflow; zippered mesh walls keep pests out without blocking views. Fresh air, no bugs—just easy comfort.

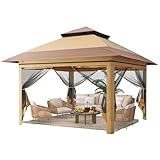
- 【Double Top in Galvanized Steel】Equipped with double roof, this patio gazebo provides effective heat insulation and ventilation, resulting in a cooling effect underneath the pavilion, creating a healthy and airy space. Featuring with the galvanized steel top, this product is rust-resistant, fade-resistant, durable and sturdy enough to withstand heavy weathers such as snow and wind.The double-roof structure adds visual interest and creates a stylish look for outdoor spaces.
- 【Design with Netting and Curtain】The backyard gazebo is designed with netting equipped with zipper and track for quick sliding, offering open view and excellent ventilation for users. The curtains with 3 binding belts provide a private, safe space for your family and keep warm on cold weathers meanwhile. Top hooks allow you to hang up decorations such as lights and fans to beautify the gazebo.
- 【Versatile and Useful】 Measured in 10' L X 12' W x 9.6' H, the hardtop gazebo covering 120 square feet offers ample room for various recreational activities. It is so versatile that it can be used as an outdoor dining area, a gathering spot for social events, or a relaxing space for lounging and enjoying nature, which can be also utilized as a parking shed for your car.
Final Words
That’s all there is to know about anchoring your gazebo to concrete; hopefully, you’re feeling confident.
Ensure that you have all the tools ready beforehand and choose a sunny day to set up the gazebo. Also, it would be best to carry out regular maintenance to ensure that it is long-lasting. If you face any difficulty, refer to my guide and try to follow the steps accordingly.
It’s time now to take your leave. Take care and see you soon!