You have an important zoom meeting to attend, but suddenly your headphones decide to give up. Panicking, isn’t it?
Last week, my husband had a couple of virtual meetings to attend. It was only moments before the meeting that he found out his headphones weren’t working, thanks to our dog, who had chewed the wires. Panicked, he rushed here and there in search of a good pair of headphones.
Seeing him distressed, I pitched in to help him. First off, I went to the neighbors and borrowed a pair of headphones for his immediate meeting. Next, I took the broken headphones and decided to fix them all by myself.
Growing up, I learned everything about DIY quick-fixes and repairs from my father, who was a pro at it. Thus, the headphone wire was fixed in almost no time. Later, I began thinking about those who could be in a similar position as my husband. That’s when I rushed to my study, fired up the laptop, and decided to put together a guide for my readers.
Hi! I’m Stacy Smith, and today I’ve curated a guide on how to fix broken headphone wires without soldering.
How To Fix Broken Headphone Wires Without Soldering
The most fragile part of any headphone is its wires. Therefore, you must take care of it. With every twist, turn, and pull, your headphone wires tear away, thereby becoming useless. Not only that, but even your furry friends can chew your headphone wires and render them useless.
Before you toss them into the bin, hold on! I’ve got some DIY ways to help you fix your headphone wires, just like I fixed my husband’s headphones. Move on and take a look.
Step 1: Get A Cable
First off, you need to get a cable. You can either take it from an old non-working headphone or buy a new one. For fixing my husband’s headphones, I used an old cable from one of my worn-out headphones. Hence, I suggest you do the same.
Step 2: Cut The AUX Cable
Next, you need to cut the AUX cable from the connector. It’s best to cut at a distance of 7 meters or more. Make sure you don’t cut less than that because they are pretty unforgiving. I suggest doing this carefully because once done, it cannot be undone. Measure the cable correctly and shear it at 8 meters from the connector.
Step 3: Remove The Rubber Sheath
After you’re done cutting the AUX cable, you will have to make a tiny cut on the rubber sheath. Then, you will have to flex the rubber sheath to diverge the tiny cut. Make sure you don’t forget to bend it on the opposite side.
When you’ve bent the rubber sheath on both sides, take off the sheath. While doing this, make sure you do it with utmost care and caution.
Step 4: Melt Off The Coating
One thing that I learned while fixing my husband’s headphones was that the copper wires are intertwined with Kapron, a kind of nylon thread. Manufacturers do this to add strength and make them durable.
You will have to peel off this Kapron wire from copper wires to add them to your headphones. To do this, I suggest using flames. Ignite the end of the cables with flames for just half a second. You must keep in mind that you need to burn just 1-cm of the wire. Once burned, put off the flame. Thus, the cables are peeled.
Step 5: Cut The Cables Of The Headphone
After the wires are peeled, next comes the headphone cables. You will have to cut the cables in the same way you cut the AUX cables. For the cables, you must keep in mind to cut no less than 3-cm from the connector.
However, to avoid any damage, I suggest you measure the cable up to 4cm and then cut it. After you’re done, melt off the coating.
Step 6: Turn And Twist The Wires Together
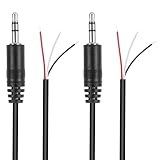
Generally, there are three to five wires within the cable of the headphone. To fix your headphones, you will have to connect three wires of the headphone cable to three wires of the AUX.
While cutting the wires, you must have noticed wires of blue, gold, and red colors. However, some manufacturers use green instead of blue. Therefore, if you don’t have the blue one, use green.
Next, you need to twist and turn the wires together. Before I begin the twisting process, let me tell you that the gold wire is of utmost importance because it is the foundation. Therefore, be careful while dealing with it.
To begin with twisting, you will have to take the gold wires of both the headphone cable and AUX cable and twist them together. In a similar manner, match the other cables and twist them together.
Step 7: Separate The Wires
As you’ve already removed the varnish, you will now have to connect them. But, before that, keep the wire twists separate from each other.
For connecting the twisted wires, I suggest you use scotch tape. Connect wire twists together, and you’re done. You’re all set to attend your zoom meetings, online classes, or video calls.
- Revive Your Favorite Audio Gear with Ease: Give your broken headphones, headsets, or speakers a new life. This 3.5mm male plug connector is designed as a direct, hassle-free replacement for worn-out or damaged audio cables, saving you the cost of buying entirely new equipment.
- DIY-Friendly Repair Solution for Everyone: No professional soldering skills required! Simply match the color-coded wires (Red-Left, White-Right, Black-Ground), connect, and secure with insulating tape.
- Engineered for Durability & Precise Connectivity: Featuring a standard 3.5mm (1/8") stereo 3-pole male plug, this connector ensures reliable audio transmission for left, right, and ground channels. The robust design provides a secure fit in any audio jack, delivering clear sound without signal loss or static interference.

- 【Precision screwdriver set】-- 40Pcs screwdriver set has 30 screwdriver bits which are phillips PH000(+1.2) PH000(+1.5) PH00(+2.0) PH0(+3.0) PH1(+4.0), flathead -0.8 -1.2 -1.5 -2.5 -3.0, torx T1 T2 T3 T4 T5, torx security TR6 TR7 TR8 TR9 TR10 TR15 TR20, triwing Y000(Y0.6) Y00(Y1.5) Y0(Y2.5) Y1(Y3.0), pentalobe P2(0.8) P5(1.2) P6(1.5), MID 2.5, with a screwdriver handle, a double-ended spudger, a long spudger, 3 triangle spudgers, Tweezers, a cleaning brush and a suction cup with SIM card thimble.
- 【Locking design and S2 steel】-- First, screwdriver handle head has locking design , which firmly locks screw bit and improves efficiency. Handle head and screw bit have magnetic design which can easily replace screw bit. Handle has a special anti-slip design which is nice to hold. Second, screw bits are made of high-quality S2 steel, so it is more accurate and durable than silver CRV bits. Screw bits are magnetically designed which can fix small screws to avoid falling.
- 【Wide scope of application】-- +1.5/2.0 P2 Y0.6 MID2.5 are used for iPhone7/8/X/XR/11/12/13. +1.2/1.5/2.0/3.0 T2/3/4/5 P2 are used for Samsung/Huawei/Xiaomi and other phones. +1.5/2.0/3.0 T3/4/5/6/9 are used for iPad/Mini/Air/Pro. +1.2/1.5/2.0/3.0/4.0 T2/3/4/5 -2.5 are used for Huawei/Honor and other tablets. P2/5/6 +1.5/2.0/3.0/4.0 T3/4/5/6/7/8/9 Y2.5/3.0 are used for Macbook/Air/Pro. +1.5/2.0/3.0 T5 are for Kindle/Kindle Fire. T6/15 are used Ring Video Doorbell/ Video Doorbell 2/Pro/Elite.
Final Words
Everything broken can be repaired, and the same goes for your broken headphones. Instead of tossing it in the bin and spending money on a new one, consider repairing it all by yourself with the process mentioned above.
Needless to say, I had a great time repairing my husband’s headphones. Surprisingly, they work as good as new. So, go ahead and give it a try!
If my guide has helped you save those favorite headphones wires, let me know. Also, if you have any queries or doubts, feel free to reach out to me. I’ll be more than happy to help you out.
With that, I shall take your leave. Stay tuned for more guides.
Till then, take care, folks!